
![]()
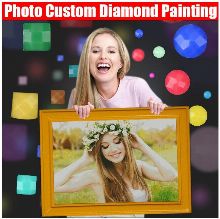
Custom Photo Diamond Painting Kit
$24.89
Retail Price:$35.00
You Save: $10.11 (29%)
$24.89
Retail Price:
You Save: $10.11 (29%)
IMPORTANT: Please SEND US A PHOTOS you need to customize! (Goldie.store E-mail: [email protected])
Turn your favorite photo into a Diamond Painting Kit!
The perfect DIY gift for holidays, birthdays, and everything in between.
Choose a larger size (at least 40cm across) to guarantee the best result.
Custom photo
Here, you can customize favorite photos, such as: birthday photos, party photos, travel photos, pet photos, wedding photos, baby photos, photo girlfriends, friends, photo and other memorable photos. Sublimate your family, friendship, love ...
About Size : You can choose size according to your needs (in order to produce the effect, need to meet the scale of the original photo).
Image sizes you can choose in choice menu:
About Photo Size Suggestions
The larger the size, the richer the details, the better the effect
The photo contains multiple people, we recommend that you choose a larger size
You can send a photo and we will show you the layout and suggest the correct size
Material : Resin
Color:as the picture shows
Application: home/hotel/office decoration & gift
Picture custom : Any Picture can be customized
About Frame: No Frame, After you complete required for adhesion to the local buy Frame Canvas Package: Roll up , Avoid Creases
Package include: Full drill diamond, printed cloth, tools
Feature :
1. The DIY diamond painting can work and learn to reduce stress, emotional adjustment, active thinking, enhance self-confidence.
2. The DIY diamond painting can be used to decorate the family room, make life more harmonious.
3. DIY production can experience a sense of achievement, ability and perseverance cultivate patience, the elderly and children are suitable.
4. Production process is simple you can create a short time to complete.
5. DIY painting diamond is exquisite to give to friends and loved ones to express good wishes to share.
6. DIY diamond draw a person of any age can be made since, including children, family members and so the family more warm.
DIY Diamond painting production steps:
1. Open the box and check the diamond draw special tools
2. View the resin diamond color, arranged in order of coding
3. Uncover tape drawing above, you will see a lot of symbols corresponding to the color coding
4. According to the corresponding color coded clamp the corresponding the resin inlaid diamonds
5. Suggested that one type of the resin diamond one set completed faster
6. In order to create a perfect diamond painting, drawings put together in one place every row symbols do not have to stay stuck diamonds
7. To cut a good figure on the drawings hold sorted array mounted to the plane of the material above
8. Splices need flat against the neat, do not have cracks
9. After a good fight, the rest of the gap at the glue corresponding symbols of diamonds
10. To complete a good diamond drawing, put it in your selection of a suitable framework (this product does not provide a framework)
Tips:
Size is manual measurement, there may be minor differences(1~2cm) This is normal, please rest assured.
Because the light is different from the screen, the color of the item may be slightly different from the picture. Please understand.
Need Advice? 3 Secrets To Choosing The Perfect Photo For Your Custom Diamond Painting
1. Choose Only Large High-Quality Photos.
2. Pay Attention To The Colors And Shading Of Your Original Photo.
3. Pick The Canvas That Best Fits Your Photo.
----
1. CHOOSE ONLY VERY LARGE HIGH-QUALITY PHOTOS.
Only submit a photo that is:
Very Large
Very High-Quality
Taken In Good Light
**If your image is even a little bit blurry or pixellated when you look at it, it will NOT work as a diamond painting. Images need to be super high quality to work.**
What makes a good photo? Pixels.
Now for the sake of metaphor, imagine each pixel is a nice little diamond.
The more pixels (diamonds) you can pack into an image (canvas), the more detail you get in your painting.
We need your photo to have a LOT of pixels (diamonds). That way, when we blow your photo up and print it onto a canvas, your final painting will look as crystal clear as your original photo.
IF YOUR IMAGE LOOKS BAD (BLURRY, PIXELLATED) WHEN YOU ZOOM IN: Choose a different image. Your original image is too small to be turned into a diamond painting. Please choose a different image for the best results.
QUICK TIP: If you have any doubts about your image, use a photo-viewing program to zoom in to your image and see how the image looks. If you're on your phone, simply pinch your screen and zoom in to see how the picture looks up close.
Need help figuring out if your image is large enough? Send an email to [email protected] with the words "CUSTOM PHOTO DP HELP" in the subject line!
2. PAY ATTENTION TO THE COLORS AND SHADING OF YOUR ORIGINAL PHOTO.
One of the most common questions we hear: "Why is the white part of my diamond painting a different color? Why does the black part of my painting contain brown and green diamonds?"
If your original photo is slightly red, or slightly blue, that color will be magnified 1000x when we turn your photo into a diamond painting kit.
And when there's a slight red hue on your entire photo, that red bleeds into parts of your painting you would expect to be white.
When we blow up your photo, every pixel becomes much more obvious. It's kind of like looking at your face in one of those super close-up mirrors. You notice every pore, wrinkle, spot, whatever. With your diamond painting, you'll notice every pixel you place with a color that just feels "off."
To stop this from happening, we recommend making some basic color and tone adjustments in your favorite photo editing program before submitting your photo for a custom. For a free tool you can use to make these adjustments on your own, you can check out LunaPic ( https://www4.lunapic.com/editor/?action=newbright )
What a world of difference some basic color adjustments can make! Pay close attention to the colors and hues in your original photo!
3. PICK THE CANVAS THAT BEST FITS YOUR PHOTO.
The 2 important things to pay attention to here:
1. Canvas Size: How Big Should Your Canvas Be?
2. Canvas Orientation: Do I Need A Landscape, Portrait, Or Square Canvas?
How Big Should Your Canvas Be?
Let me counter your question with another question: how many people, dogs, etc. are in your photo?
Consult the helpful chart above as a reference for what size canvas you should order based on how many people are in your photo!
**We advise that the subject of your photo take up most (70-90%) of the frame for the ideal diamond painting.
When in doubt, here's a good rule of thumb our fans swear by: the larger the canvas you order, the more detail your diamond painting will have.
Do I Need A Landscape, Portrait, Or Square Canvas?
That depends. Is your original image landscape, portrait, or square?
Make sure you choose a canvas size that corresponds to the aspect ratio of your original photo!
For example, if your original image is LANDSCAPE, you want to choose a canvas something along these lines:
30x20cm
60x40cm
90x60cm
**If you select a SQUARE canvas and send us a LANDSCAPE photo, we will have to crop your photo. While we can guarantee you we'll do our best to carve out the perfect diamond painting, we can't guarantee we won't accidentally crop out someone or something you love.
About color differences and size errors
Cut out, make, measurement may cause size deviation (plus and minus1-2cm fluctuation), color aberration is due to the monitors, weather, lighting and other factors, Pictures will have different color in different monitors but this does not affect the appearance of the painting.